Really Great Rolo Brownies

Before I start this recipe, apologies for those of you that follow this blog- I realise I haven’t posted in a while! I’ve been trying to eat healthier because, you know, new year, new you etc etc. Hence me trying not to bake so much because when you bake stuff you kind of have to eat it afterwards… shame I know! However, I’ve realised that cutting out sweets and puddings isn’t all that realistic, so I’m trying to aim more towards everything in moderation (plus more exercise!) Although this has meant cutting smaller slices of everything than seems reasonable to a sweet-tooth, it seems to be working so far! I’m under no illusion that this recipe is in the slightest bit healthy, so enjoy, but cut small pieces everyone…

Rolo Brownies

Ingredients

  • 200 g Dark Chocolate
  • 100 g Butter
  • 250 g Caster Sugar
  • 4 medium Eggs
  • 1 tsp Vanilla Essence
  • 60 g Plain Flour
  • 60 g Cocoa Powder
  • 150 g Dark Brown Soft Sugar
  • 150 g Butter
  • 397 g Condensed Milk
  • 200 g Milk Chocolate
  • 2 tubes Rolos

Method

  1. Preheat the oven to 180C. To make the brownie base, first break up the dark chocolate and melt, then put to the side to cool.
  2. Mix together the butter and caster sugar until fluffy, then add the eggs and vanilla essence, beating well after each addition. Take the melted dark chocolate from before (make sure that it’s not too hot) and add to the mixture. Mix in thoroughly then add the flour and cocoa powder and gently stir in.
  3. Spoon the mixture into a 20 x 25cm brownie tray then spread evenly. Bake in the oven for 20 mins, then place to one side to cool.16667875_10154139957481143_1010361292_o
  4. To make the caramel, heat the dark brown sugar and butter into a non-stick pan, stirring until melted. Then, add the condensed milk and bring to the boil, stirring continuously. Cook for a minute or so until you feel the mixture thicken. Take off the heat and allow to cool a little. The consistency should be as in the picture below- it should hold on the back of a spoon without running off.16651528_10154139957456143_1981830470_o
  5. Once the brownie base has had time to cool, pour the caramel over the brownie, spreading out until you have an even layer of caramel covering all the brownie. Leave to one side until the caramel has cooled completely.
  6. To decorate, melt the milk chocolate and pour over the caramel, spreading evenly and making sure you’re not pressing down too hard when spreading it (I’d use a palate knife or a spatula). Before the chocolate has set, sprinkle on the Rolos and any other decorations you like! I used chocolate chips and garnished with a chocolate pudding sauce (I would have preferred a thinner caramel sauce but I didn’t have any!)16710576_10154139957426143_1883307032_o
  7. Allow the top layer to set, then cut into slices and serve!

Handy Hints

Making the caramel- make sure that you use a non-stick pan for this. If you don’t because, like me, you’re thinking ‘meh, it doesn’t really matter’ then you’ll end up with black little dots in your caramel, which are little burnt bits of sugar. Tastes ok, but not ideal!

Setting time- It is important with the caramel and the chocolate, to let each layer cool before you add the next one. I realise this means patiently waiting, but if the layer you’re tying to add to is still hot then the two layers will just mash together.

16709634_10154139874911143_1164085339_o

Hidden Batman Cake

So last week I was asked to bake for a board games day in our village (yes, that’s as wonderfully nerdy as it sounds!), so I decided to make something that might appeal to those bakers/ lovers of cake that are a little more on the nerdy side. This being said, if nerdy isn’t quite your style, Batman can be replaced with another shape and you’re away! Surprise (or ‘hidden’) cakes are an amazing concept to me- I love the fact that, from the outside, the bake looks just like a normal loaf cake, but then you cut into it and BAM- there’s a cool design! The downfall with this of course is that this can render the baker a nervous wreck, as you don’t know whether it’s worked until you cut into it. Despite having made this recipe beforehand at uni, not knowing whether the pattern had worked until 5 minutes before the cafe at the games day opened was a little nerve-wracking to say the least! Having seen other hidden pattern cakes online, I’ve found that many of them use the same sponge mix in the middle (for their shape) as they do for the surrounding sponge. I found this a little dry, so my recipe uses a chocolate sponge in the centre to give it that little bit of variance and richness which is needed when you’re lacking a jam or buttercream layer in the middle of your slice.

Hidden Batman Cake

Prep Time: 40 minutes
Cooking Time: 30-40 minutes

Ingredients

2lb Loaf Tin (23 x 13cm/ 9″ x 5″)
Brownie Tin (35 x 25cm)

For the Batman centre:

1 Batman cutter (such as this one)
6oz Butter
6oz Caster Sugar
3 Eggs
4.5 oz Self-Raising Flour
1.5oz Cocoa Powder

For the sponge:

8oz Butter
8oz Caster Sugar
4 Eggs
1 tsp Vanilla Essence
8oz Self-Raising Flour

Method

1. Preheat the oven to 180C, grease the two trays and line them with greaseproof paper (this makes it SO much easier to remove from the tin!)
2. To make the Batman centre: soften the butter in the microwave and beat with the sugar until light and fluffy. Add the eggs, flour and cocoa powder and mix until fully incorporated.
3. Spoon the chocolate sponge mix into a brownie tin and spread evenly. Bake for 10-12 minutes, or until a skewer inserted into the middle of the cake comes out clean. Set aside, preferably on a wire cooling rack, to cool.
4. To make the sponge: soften the butter in the microwave and beat in the sugar until light and fluffy. Add the eggs, flour and vanilla essence and beat until all the ingredients are fully incorporated. Spoon a little under half of the mixture into the loaf tin, place in the oven and bake for around 10-15 minutes.
5. While the bottom half of the loaf cake is in the oven, take the cutter of your choice (in this case, Batman!) and press out 12 shapes from the chocolate mix. You want these shapes to be as accurate as possible to the cutter, so make sure to be careful when removing the sponge from the cutter!
6. Remove the bottom half of the sponge mix from the oven. The mixture should be spongy, but should not feel fully cooked (it will not yet be golden in colour).
7. In a line along the centre of the loaf tin (along the tin rather than across the tin, so that each slice will have a shape in it), place the shapes onto the partly-cooked sponge mix. Press the shapes tightly together and make sure that they are lined up as closely as possible.
8. Next, add the rest of the sponge mix around the sides and top of the shapes (making sure that the mix reaches the bottom half of the sponge at the sides and completely covers the shapes at the top.)
9. Place back in the oven and cook for 20-30 minutes until golden, and until a skewer inserted into the middle of the cake comes out clean.
10. Leave to cool, decorate with some buttercream (remove the mint from the buttercream in this recipe if you’re not sure how) and lift out of the tin onto a plate. When you’re ready to serve, cut the cake in half and pray that you lined your shapes up well enough/ that your oven cooks evenly enough for them to show through!

Handy Hints

Shapes– despite doing this myself, I would recommend that if you’re doing this for the first time and aren’t a particularly confident baker, you use a more simple shape than a batman cutter! The best thing is something with not too many edges. Make sure to line up the shapes as best you can!
Cooking the sponge– Don’t do what I did the second time I made this and leave the bottom half in for too long! It still turned out fine, but the bottom half of my mix was a little overcooked, and you could see a line where this happened!
Ovens– If you know that your oven doesn’t quite cook evenly, make sure that you turn your cake around half way through cooking, otherwise you’ll have wonky shapes through the middle.
Buttercream– This can be bought already made, or made very easily yourself, but it really does need to be added, as it brings a little moisture to the mix. Maybe decorate it with a clue to what’s inside?! I piped my first one with the words “Na Na Na Na, Na Na Na Na…”
Sponge mix– Don’t worry if the sponge mix takes longer for the top half to cook than the bottom half, it does take longer in a loaf tin for the top to cook.

batman-cake

Ice Cream Cake

Summer is here!! For all you students and year 13s out there, that means you’re finished with exams- congrats! Take advantage of your time off to go and do fun stuff (maybe even bake something new…) I feel like I actually have a right to say that now that I’m working on my dissertation through summer. And yes I know, I brought that upon myself by doing a Masters degree, but that doesn’t mean I can’t sit here and feel sorry for myself, ok? But anyway,from the midst of my pity-party came a great idea- a combination of my favourite thing (cake) and summer (represented here by ice cream).

Although summer seems to be manifesting itself largely in the liquid sunshine form here in the UK so far, I feel that it’s summer-y enough to start consuming large quantities of ice cream.  I briefly toyed with the idea of making a baked alaska for my first summer post, but quickly realised that a) although it’s impressive, it seems like far too much effort and b) I don’t have the freezer space for a cake like that. Also, we all know how making baked alaska in the summer goes- especially if you’re in a very warm tent with other bakers… (too soon?!) The idea behind my ice cream cake seems to me to be much simpler, and also fit better in my shared freezer shelf! It has a brownie base, ice cream middle and chocolate ganache topping, which makes for a nice combination and isn’t too rich.

Ice Cream Cake

Baking time: 20 mins

Preparation time: 30 mins (not including cooking time)

Ingredients

200g Dark Chocolate
100g Butter
250g Caster Sugar
4 Eggs
1 tsp Vanilla Essence
60g Plain Flour
60g Cocoa Powder
900ml tub of Vanilla Ice Cream
100g Milk Chocolate
200ml Double Cream

I baked this in my 23cm diameter springform tin.

Method
1. Preheat the oven to 180C. Break up the dark chocolate and melt in the microwave until smooth. Set to one side.
2. Beat the butter and sugar until fluffy. Add the eggs, mixing a little after each one, then add the vanilla essence and mix until the eggs are fully combined.
3. Add the melted dark chocolate to the mixture and stir until combined. Next, add the flour and cocoa powder and mix until all the ingredients are well combined.
4. Spoon the mixture into a greaseproof paper-lined cake tin and spread evenly. Cook in the preheated oven for 20 minutes.
5. Remove the brownie base from the oven and set aside to cool. Once it is cool, take the ice cream out of the freezer to melt slightly.
6. Once the brownie base has cooled completely, spread the slightly melted ice cream onto the brownie base, spreading as evenly as possible and making sure to cover the brownie base. Once the ice cream has spread, place the cake tin in the freezer.
7. Whilst the ice cream re-sets in the freezer, make the chocolate ganache. To do this, first break the milk chocolate into pieces, then heat up the cream in a saucepan until boiling.
8. As soon as the cream reaches boiling point, add the cream to the broken up milk chocolate and stir until the chocolate melts and combines with the cream.
9. Once the cream and chocolate are combined, take the cake from the freezer and pour on the ganache. Spread the ganache evenly over the ice cream layer. It is important to do this quickly as the ice cream will start to melt due to the heat of the ganache, so as soon as it is spread, place the cake back in the freezer.
10. Store in the freezer until you’re ready to enjoy it!

Handy Hints
Ice Cream- Although I made this with vanilla ice cream, I think it would also be great with other flavours, such as mint or cherry (two of my favourites!) I would avoid anything too sweet though as it may make it too rich overall!
Cooking- These brownies are quite fudgy, but should still pass the knife/ cake tester test (i.e. the knife should come out clean after sticking it in the brownie)
Spreading Ice Cream- This process can be a little tricky. You want the ice cream to have melted enough so that you can (roughly) spread it, but not so much that it becomes soup! If it’s easier, cut chunks of ice cream and fit them together like a jigsaw on the brownie base!
Ganache- When making the ganache, keep stirring the cream and chocolate at all time until they’re combined. If you let it cool too much, it’s still fine but it will have a thicker consistency, if you want a smooth, glossy finish then you’ll have to add the ganache whilst it’s still quite warm.
Serving- If you are serving the whole thing at once, then defrost for 5-10 minutes before serving. If you want to cut a slice or two, this is more difficult but I found that for the most part it cut ok, even when I’d just taken it out of the freezer. Don’t leave it too long or the ice cream will melt everywhere!


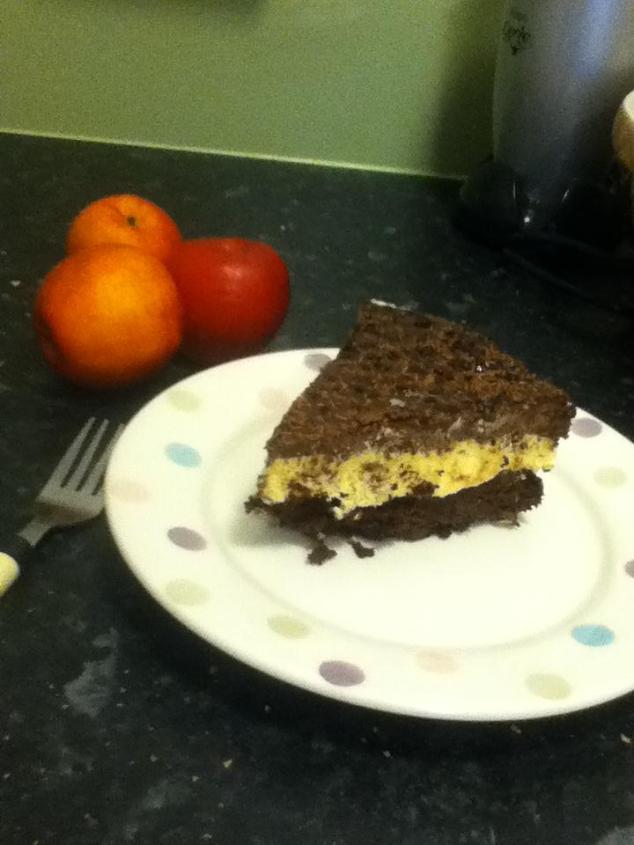
13621008_10153582408586143_5882386355269474609_n

P.S. The apples totally offset the huge slice of cake, right?!

Dark Chocolate and Cherry Flapjacks

I’ve realised recently that I take baking for granted. Baking is such a normal occurrence in my house and I’ve been baking it since I was little (under strict supervision of course in the earlier years!). I never really thought anything of this until I talked to my flatmate, who is relatively new to baking. It seems perfectly normal to me to not have to look up how to bake a Victoria sponge cake and to know what it means when a recipe says something like ‘whisk to soft peaks’, but not everyone has this experience. This can make it difficult to know where to start with recipes, especially if you’re starting with no-one to guide you along the way, as my family have done. I’m really glad that my flatmate joins me when I’m baking, even if it turns out that it’s all been a scheme to get free food! I hope that, if he can overlook me being a bit bossy occasionally, he might learn some things about baking in order to be able to enjoy baking by himself. But for people who do want to try baking by themselves, and who don’t have a friend to guide them, it occurred to me that some recipes aren’t all that suited to beginners and that maybe more recipes about the simple stuff need to be out there. And so came the idea for this post.

I was talking about what to bake next for my blog with the aforementioned flatmate, and he asked me ‘what’s a really easy thing to bake for a beginner?’ My immediate thoughts were all things that I’ve written up recipes for at some point or other on this blog: brownies, cookies, cupcakes; but one thing in particular came to mind- flapjacks.

Flapjacks used to be something of a signature bake of mine and I’ve been baking them for a long time. They’re a nice easy bake that I used to make on my own before I built up the courage to bake things that were a little more complicated. Once you’ve got the hang of the simple base recipe, you can be creative in adding whatever extra flavours you like! This recipe adds two of my favourites: cherry and dark chocolate. If those flavours aren’t your cup of tea, simply swap them for something else (more advice on this in the Handy Hints section).

Dark Chocolate and Cherry Flapjacks

Baking time: 45 mins- 1 hour (Oven time 30-35 mins)

Ingredients
170g Butter
70g Soft Brown Sugar
2 tbsp Golden Syrup
340g Porridge Oats
100g Dark Chocolate
150g Glacé cherries

Bakes in a greaseproof paper-lined brownie tray

Method
1. Preheat the oven to 160C. Melt the butter in a pan, over a low heat. Stir in the sugar and golden syrup until combined. Take off the heat.
2. Add the oats and stir until the butter mixture coats the oats.
3. Chop up the chocolate and cherries into small chunks (I’d recommend cutting the cherries in half)
4. Stir in the chocolate and cherry chunks until evenly distributed.
5. Place in the lined baking tray and cook in the oven for 30-35 minutes until the oats are golden coloured.
6. Remove from the oven and leave to cool. The flapjacks will continue to bind together a bit after they’ve been removed from the oven, so don’t panic if they look really crumbly.
7. Cut into squares and serve!

Handy Hints
Ingredients Swap- If you don’t want to add chocolate to this mixture (why not?!) then use 225g of Butter instead. If you’re swapping dry ingredients, use the same quantity as the cherries. If the ingredient you’re adding isn’t as sweet, add a little more sugar to the mix.
Other flavours- the classic dry ingredient to add would be raisins, but I would recommend maybe white chocolate and cranberry or topping normal flapjacks with toffee, chocolate or caramel.
Baking- Make sure to press the mixture into the tin when you transfer it from the pan. This will help it to come together a bit better.

13296183_10153495895176143_308661046_n

Na-na-na-na Na-na-na-na… Pancake!

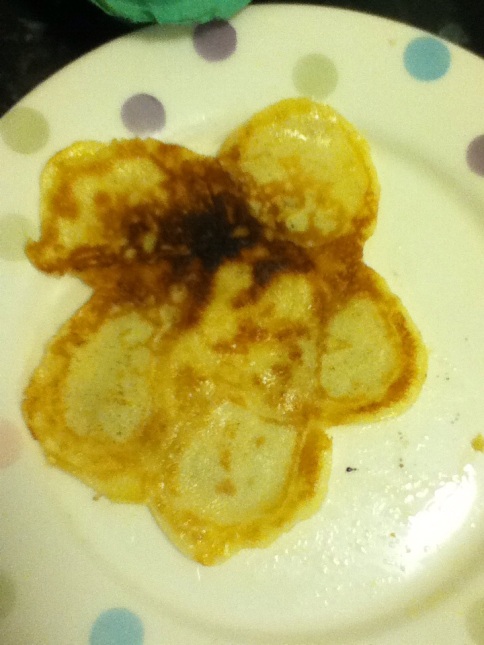
So it seems to be that a huge baking trend lately is pancake art. These sort of trends always get me- it’s the sort of thing that you see on Buzzfeed or Facebook that looks really easy and makes me think ‘I could do that’. The idea, if you’ve somehow missed this, is that you draw a shape with pancake batter, let the outline cook, then fill in the middle. The outline should then cook more than the filled-in middle, making the lines defined. This is made to look very easy, so the other day I invited some friends round and we gave it a go. Needless to say, it was a disaster. Here’s the best attempt we came up with:

Flower fail

I think the problem is that our mixture was a thinner pancake mix, rather than the thicker batter used for more American-style pancakes but I’m not sure! If any of you know how to stop getting the patterns on the pancakes, please comment and let me know!

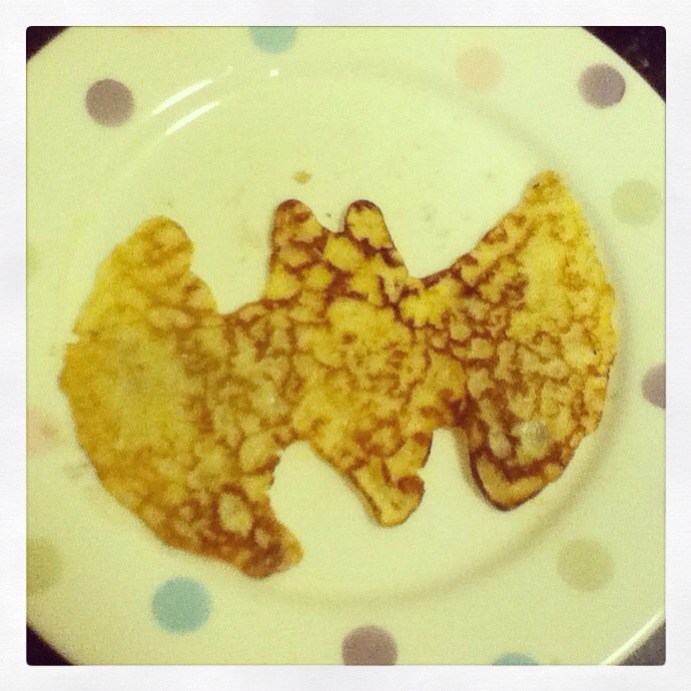
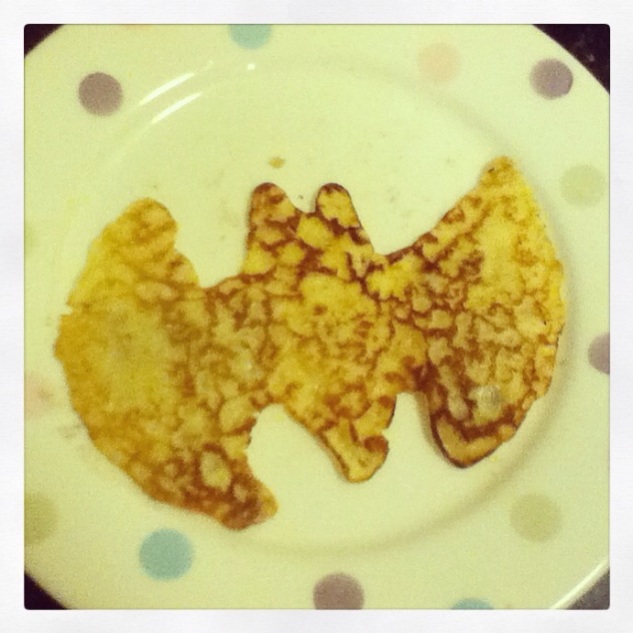
Now you might think that given the disasters that we’d created so far, we’d have just given up (the picture above is honestly the best one we managed), but we weren’t giving up that easy. We still had half a batch left so, driven by a stubborn determination to create something worthwhile (felt more strongly in some of us than others it must be said), we adapted our technique to creating pancakes in the shape of things instead. This we had a lot more success at! If you’re looking for something easy and fun to do then this couldn’t be better, even for those who may be more artistically-challenged! The trick is to pipe the outline quickly, then fill it in with batter from a jug and, as long as you’re careful not to pour too much on and spill it over the outline, you’re good to go!

Pancakes are perfect for anyone who wants to bake something easy and doesn’t have much time, or patience, to wait for things to cook/chill. They need three ingredients, no fancy equipment (if we can make something at guide camp, you can make it in a student kitchen) and taste nice with any number of toppings. If you’re not feeling artsy, or just don’t fancy faffing about making your food look pretty before you demolish it, then just follow this recipe ignoring the bits about separating the mixture, and just pour your batter into the pan- simple!

If you do want to be artsy, you’ll need an empty sauce bottle- you can buy these online or from lots of shops, an example of one is here.

Pancakes

This recipe makes about 10 small pancakes.

Ingredients:

2 eggs
125g (41/2 oz) plain flour
250ml milk
Butter
Toppings

Method:
1. Add the eggs to the flour. Add a little milk.
2. Whisk gently until the mixture becomes thick, then add a little more milk and mix again.
3. Making sure to mix in all the flour from the sides, add the rest of the milk and whisk until all the ingredients are fully combined and the mixture is smooth. Separate the batter between the bottle and a measuring jug.
4. Melt a small amount of butter in a frying pan on the hob (medium heat) and tilt the pan until the melted butter covers the pan.
5. (to make pancake shapes) Using the batter in the sauce bottle, draw onto the pan the outline of your shape. Fill the inside of the shape with batter from the jug, making sure not to pour too much at once (or it’ll spill over the edge and ruin your shape!)
6. Let the pancake cook until it starts to come away from the pan, then flip it over (whether you use a spatula or your awesome pancake-flipping skills is up to you) and let the other side cook.
7. Serve and add toppings!

Handy Hints:

Shapes- Create away! Let your imagination run free- anything is possible! (well actually there are some limits, my friend did attempt the Sistine Chapel, which I think is taking it a little too far.)
Cooking time- Pancakes cook quickly, so you shouldn’t be waiting long. It’s cooked on one side when it starts to come away from the pan- wiggle the pan and if it moves without sticking, it’s cooked on that side.
Batter- If you’re using a bottle to make the shapes, make sure that there aren’t any chunks of flour in your mixture, as they’ll get stuck in the nozzle!

Batman pancake


Candy Cane Cupcakes

It may seem a little too soon for some of you to be reading a Christmas recipe, but it’s definitely acceptable now because it’s December!! I love it when it reaches December because no-one can complain about me getting excited for Christmas. I love Christmas (just in case you hadn’t picked that up!) It’s such a good time of year, and I really enjoy the build-up through December. I love Christmas jumpers, hot chocolates, and most of all, Christmas puddings! We always have family over to stay for Christmas in my house, which is great because me and my mum get to bake whatever we want to, and know that it’ll be eaten quickly so we can bake something else! It’s a great excuse to bake all the things that I deem too expensive when I have to pay for the ingredients myself (ta mum!), or simply too fancy for everyday life. And what better way to spread a little Christmas spirit than by sharing some bakes?!

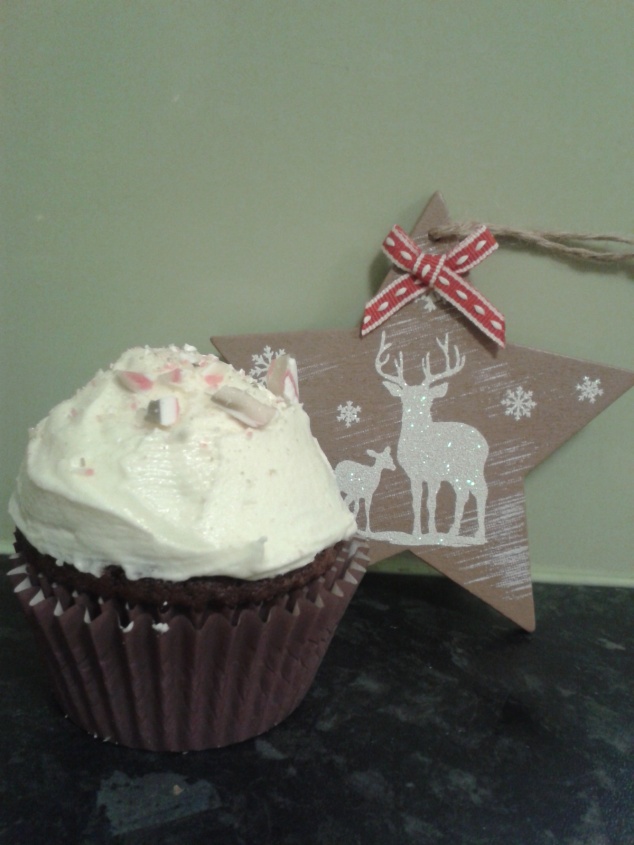
So, because it’s now December, I wanted to come up with a recipe that was Christmas-y but also would be good to make at uni. I actually made these cupcakes for my flatmates and also to take in for one of my lecture groups, so they’re great for spreading the Christmas joy! The idea for these cupcakes came from the leftover candy cane segments I had after making Candy Cane and chocolate lollies. These cupcakes have a mint chocolate truffle centre, and a minty buttercream topping so are not only decorated with candy cane bits, but have the great sweet mint flavour too.

Candy Cane Cupcakes
Preparation Time: 30 mins (total)
Baking Time: 20-25 minutes
Cost: £3.62

Ingredients
For the cupcakes:
165g Butter, softened
165g Caster Sugar
3 Eggs
165g Plain Flour
25g Cocoa Powder
2 tsp Baking Powder

For the mint truffle centre:
225g Icing Sugar
30g Butter
25g Cocoa Powder
2 tbsp Milk
1/2 tsp Peppermint Extract

For the mint buttercream:
140g Butter
Icing Sugar (at least 200g)
A dash of milk
Peppermint extract (to taste)
Crushed pieces of candy cane/ Christmas-coloured sprinkles to decorate

(makes 12)

Method
1. Preheat the oven to 180C. Cream the butter and sugar together until smooth and creamy. Add the eggs and mix until combined and smooth.
2. Add the dry ingredients and mix until combined- scrape down the sides of the mixing bowl to make sure it’s all combined properly.
3. Line a cupcake tray with cupcakes cases and fill the cases, spooning in the mixture until the case is about two-thirds full.
4. Bake in a pre-heated oven for 20-25 minutes, until the sponge springs back when pressure is applies, or until a knife or cake-tester comes out of the cupcake clean. Leave on one side to cool.
5. Whilst the cupcakes are cooling, make the mint truffle centre mixture. First, melt the butter slightly in the microwave until soft. Then, add the icing sugar and cocoa powder and mix until fully combined.
6. Add a dash of milk if needed to soften the mixture slightly, then add the peppermint extract to taste.
7. Once the cupcakes have cooled, taking one at a time, spoon out a small circle from the middle of the cupcake and extract the sponge from beneath it until you have a small hole in the middle of the cupcake. Don’t spoon too much mixture out- there should still be plenty of sponge surrounding the dip, and it shouldn’t go to the bottom of the cupcake case.
8. Once the holes have been cut in all the cupcakes, spoon a little of the mint truffle mix into each hole until it fills it to a level top.
9. Put these to one side to make the buttercream icing (preferably covered and in a place that isn’t too warm!)First, soften the butter in the microwave. Then, add the icing sugar and mix until combined. Start with equal quantities, then keep adding icing sugar until you reach a slightly stiff consistency. Add a dash of milk to create softer icing, then add some more icing sugar.
10. Add peppermint extract to the icing to taste, and mix to incorporate. Ice the cupcakes, then add crushed candy canes/ sprinkles to decorate!

Handy Hints
Even cupcakes- to get cupcakes that are the same size, try using an ice-cream scoop to make sure you have an even amount of mixture in each cupcake case (you can tell I didn’t do that!)
Filling the centres- You may have to use a teaspoon to gently press down the truffle centre into the cavity in the cupcake. Fill the hole to the top to make it an even top when you’re adding the buttercream.
Buttercream- If you’ve used margarine instead of butter to make your icing, don’t add the milk, as this will require a lot of icing sugar!

2015-11-30 21.20.57

Cookie Monsters!

This week my family was invited to a board games day (yes that’s as nerdy as it sounds) for a family friend’s birthday, and we were asked to bring something sweet to contribute to the wide selection of food to be consumed between games. I thought these monsters were perfect for the occasion – not only because they are very snackable, but also because they would appeal to the young gamers (and those that are young-at-heart!). And it was biscuit week on the bake-off – perfect.

I got the idea for these cookie monsters from a trip to Bakewell earlier in the week, where we saw some that were kind of similar in a little bakery, and I have to admit I was quite pleased with them. They’re a good recipe for students, even if they are a little childish for some, because they’re very easy to make, they are perfect afternoon/ evening snacks and they have a bit more flavour than a plain cookie. The only problem you could possibly have with these happy characters is getting a little too attached to them! I grew quite fond of a particular one of mine, who looked so cheerful I didn’t want to eat him- that could be just me though?!

This recipe is more of a construction recipe, as these monsters could be made from any cookie recipe. I used the one in my Divine Chocolate cookbook, which creates great cookies with plain chocolate chunks and a nice soft texture. I’ve included a simple buttercream recipe below, but that’s all the filling is, so there’s a wide scope for creativity here- weird and wonderful flavours at the ready!

Cookie Monsters
Preparation Time: 45 mins (depending very much on how much of a perfectionist you are!)

Ingredients
15 cookies, cut in half
6oz Butter
Icing Sugar
A dash of milk
*Flavouring
Food colouring
Smarties, or any other round sweets

Method
1. Soften the butter in the microwave. Add some icing sugar and the milk and mix until combined. Keep adding icing sugar until you reach a texture light enough to pipe- you should be able to mix the buttercream without too much force, but it should be thick enough to stay on a spoon without dripping off.
2. Add any flavouring to your buttercream. *I used orange, lime and strawberry, so used the zest of these fruits and a couple of tablespoons of strawberry milkshake powder for the strawberry one. These really just need to be added to your taste.
3. If you want a strong colour, add a few drops of food colouring to the mixture.
4. Fill a piping bag with a large star nozzle with your buttercream.
5. Placing one half of the cookie in front of you, with the flat side at the back, cover the top with buttercream. I found it best to start in dots around the front crescent of the cookie (like teeth) and then fill in with dots behind this afterward.
6. Take the other half of the cookie and gently place the straight line along the straight line of the other half- you’re aiming for a jaw-like structure here, so the top half doesn’t want to lie flat along the bottom cookie.
7. Repeat for all cookies.
8. Pipe two dots for eyes on the top of the assembled monsters. DON’T press down too hard on these, or you’ll squash all your delicate piping work!
9. Press a smartie on to each dot of buttercream.

Handy Hints
Cookies- It’s best to cut your cookies in half while they’re still warm, as then you don’t run the risk of your cookie completely crumbling when you cut it.
Flavours- If you’re using zest, I used the zest of half an orange for my orange mix, and half a lime for the lime mix.
Colouring- Don’t add too much food colouring, as your mixture will go too runny. If this does happen, add some more icing sugar until you reach the right consistency again.
Construction- I found that they looked better, and held their shape more, when I used the bigger half (yes I know technically they should all be even but such is life- I’d be hopeless on the bake-off) as the top half of the jaw.

Cookie Monster

Chocolate Orange Cake

Chocolate Orange has always been a bit of a thing in my family. It started with my mum being given a Terry’s chocolate orange every year for Christmas and just expanded into a family favourite. I feel like chocolate orange is also the perfect flavour to experiment with if you’re a new baker, or a student baker, because it’s so cheap and easy to create.

The inspiration for this recipe came from a rainy day on holiday in Scotland. Being Scotland, it had started to rain as soon as we’d arrived at the town we were intending on looking around so we decided, in a very English fashion, to go and hide in a cafe until the rain eased. I ordered a slice of chocolate orange cake, which was very nice (and they weren’t stingy with the slice size either!) and lead to me thinking that maybe I should try and re-create it at home. This is the result!

The recipe for the sponge came from my Grandma’s recipe (aren’t grandmas just the best for baking?!) and I love it because it creates a really good flavoured sponge without being too dry. It’s a great recipe too because it’s a fully hands-on kind of recipe- none of this using an electric mixer nonsense! There’s no orange flavour in the sponge because I didn’t want the orange to be too overpowering, so the orange comes from the curd and icing.

Chocolate Orange Cake

Preparation Time: (sponge) 15 mins, (icing) 5 mins (curd) 15 mins
Cooking Time: 30-35 mins

Ingredients
For the sponge:
175g (7oz) Self-raising Flour
200g (8oz) Caster Sugar
1/2 tsp Salt
25g (1oz) Cocoa
100g (4oz) Margarine
2 Eggs
5 tbsp Evaporated Milk
5 tbsp Water
Few drops Vanilla Essence

For the curd:
(this was adapted from a recipe by http://africanbites.com/?p=6021 which is amazing- really clear and easy to understand- even for a beginner like me!)
1/2 cup (4oz) Butter, softened in the microwave
3 Eggs
Juice of 2 Oranges
3 Tablespoons Orange Zest
3/4 -1 Cup of Sugar (depends how much of a sweet tooth you are!)

For the Icing:
2oz Butter
20g Cocoa Powder
A dash of Milk
Icing Sugar (start with 2oz)
Grated zest of 1/2 an Orange (but can change depending how orangey you want it)

Method

For the sponge:
1. Pre-heat the oven to 180C. Mix the flour, sugar, salt and cocoa powder together.
2. Rub the margarine into the dry ingredients using the tips of your fingers until you have a consistently crumb-like mixture.
3. Stir in the eggs, vanilla essence, evaporated milk and water then beat well until combined and smooth.
4. Grease and sprinkle some flour on 2 x 8 inch cake tins (NOT loose-bottom ones). Divide the mixture between them.
5. Bake for 30-35 mins until the sponge springs back.

For the curd:
1. Whisk together all the ingredients in a large, microwave-safe bowl until smooth.
2. Place in the microwave for one-minute intervals, stirring after each interval. After around 4-5 minutes the mixture should have thickened up. It’s done when it’s thick enough to coat the back of a wooden spoon without running off into the bowl.
3. Remove from the microwave, cover and cool.

For the icing:
1. Soften the butter slightly in the microwave.
2. Add the other ingredients, then whisk with a hand-mixer until smooth. If the mixture is too thick, add icing sugar until it thins out. Keep adding icing sugar until you reach the desired consistency.

Once the sponges have cooled, sandwich together with the curd, then spread the icing over the top and sides.

Handy Hints
Sponge- Don’t worry that the mixture is really runny before it goes in the oven! This is why you shouldn’t use a loose-bottomed tin, as it will run out the bottom.
Curd- Make sure that the butter is softened before you whisk the ingredients as if it isn’t it will result in a lumpy mixture.
Icing- You can add as much icing sugar and orange as you like to suit your preferences. Everyone likes different consistencies and different amounts of zesty-ness!
Decoration- I’ve decorated mine with mini Terry’s chocolate orange pieces.

DSCN1784

Salted Caramel Blondies

Hi everyone! Firstly, a quick apology for the fact I haven’t posted a recipe for a whole term (oops)- it was my finals and then I went straight on holiday, so it’s been a little crazy! However, I am now officially a graduate (wow that’s weird!), so I thought it was about time I baked another recipe.

This is a recipe I’ve had bookmarked for ages now, so I thought I’d give it a whirl the other day. I adapted it from the original recipe, which was for salted caramel and butterscotch blondies and can be found here. I adapted it because I believe in posting recipes that you can get all the ingredients for easily- especially if you’re a student, and some of them in the original aren’t as readily available as they perhaps are in America. I feel like salted caramel has turned into a bit of a trend in the baking world lately and I have to admit I’ve become a little obsessed myself! Brownies are one of my favourite things to bake and they’re perfect for students as they’re easy to make, keep better than a lot of cakes and don’t use too many ingredients. This is a great twist on a traditional brownie recipe, so if you’re feeling that beach vibe, why not inject a little sea salted caramel into your life to tide you through (haha) until the weather improves?!

Salted Caramel Blondies

Preparation Time: 15 mins
Cooking Time: 30-35 mins

Ingredients
2 1/8 cups Plain Flour
1/2 teaspoon Baking Soda
1/2 teaspoon Salt
12 Tablespoons Unsalted Butter
1 cup Light Brown Muscavado Sugar
1/2 cup Granulated Sugar
1 Egg
1 Egg Yolk
2 teaspoons Vanilla Sugar
1 cup White Chocolate Chips
1/2 cup Salted Caramel Sauce
Sea Salt

Method
1. Preheat the oven 165C, and line a brownie tin with greaseproof paper.
2. In a separate bowl, whisk together flour, baking soda and salt. Set aside for later.
3. Combine the butter and sugars, then add the egg, yolk and vanilla extract and mix until smooth.
4. Slowly add the dry ingredients, mixing on a low speed until they are combined. Stir in the chocolate chips.
5. Press half this dough into the tin, flattening with a spatula. Drizzle the caramel sauce over this dough, then top with the remaining dough. This may turn out quite messy with some of the caramel showing through- that’s fine! Sprinkle with sea salt.
6. Bake for 30-35 minutes until golden brown.

Handy Hints
Stage 5- For this stage I recommend either flattening out the other half of the dough before you place it on top of the caramel, or using slightly less caramel sauce. Once the caramel sauce is covering the blondies, it’s a messy job trying to cover it!
Chocolate chips- I used white chocolate chips in keeping with the ‘blondies’ theme, but using milk, or even dark chocolate chips might dial down the sweetness slightly.
Ice cream!- these these go very well with ice cream, and maybe even an extra sprinkle of caramel sauce!

Salted Caramel Explosion!


10 New Year’s Resolutions (Baking style)

Happy New Year everyone! As you all know, New Year is a time for making promises of things that, usually, you want to give up or achieve. Though, in principle, I think this is great I have to say that, as I am an excellent procrastinator, making New Year’s Resolutions can be a bit of a stretch. Most of them seem to have accidentally been broken by February, if they even make it that far. However, I love the spirit of it and how enthusiastic people get about them this time of year, so I decided to make some. In order to make it realistic for me, they’re more kind of goals than resolutions (less of the “I won’t do this ever” and more of the “I might have a go at this” style), which some of you may want to adopt too. So now, when people ask me “so, what’s your New Year’s Resolution?” I have an answer instead of awkwardly having to mutter that I don’t have one and facing the shame when they, of course, have an amazingly fulfilling idea. I may not keep them, but I’m a strong believer in setting goals and challenges, so I’ll give it my best shot.

1. Bake more for fun- don’t let baking become a chore. 
I always enjoy baking, but I made this a resolution as I think I tend to make baking a bit of a chore sometimes when it really doesn’t need to be! So, I want to enjoy it more and not do it if the only reason I’m baking is because I feel like I have to.
2. Bake more for family and friends.
For Christmas presents, I made my friends some cookie batter so they could store it in their freezer and have homemade cookies whenever they felt like cooking them. Aside from this being a nice gift (I hope!) I really enjoyed just baking for other people as I think homemade things really show sentiment and I love putting that time and effort into making something for someone else.
3. Challenge yourself- stop being scared!
This one works for life as well as baking, but I think too often that I don’t bake things because I think I’ll mess them up and they won’t look or taste right, but I really do want to challenge myself more.
4. Bake more healthily.
Not all the time, but I think it’d be good (for my body and my teeth) for me to try baking some more healthy options every once in a while.
5. Spend more time on presentation.
When I have the time, I love spending ages making things look amazing, but when I’m at uni I find myself being a bit lazy with presentation. This isn’t always a bad thing, it’s more a case of I know I really enjoy it so why aren’t I doing it?
6. Try some savoury bakes.
Apart from pasties, I hardly ever bake anything that isn’t sweet! Which is crazy considering the amount of baking out there that can be used as meals. Also, they tend to be healthier.
7. Use more Fairtrade ingredients.
It’s probably clear from a lot of my other posts that I’m a big supporter of Fairtrade, so I’d love to commit more to Fairtrade by trying to buy more Fairtrade ingredients when I’m baking. A lot of supermarkets’ own-brand stuff is now Fairtrade, so I have no excuse really.
8. Experiment!
This kind of goes hand-in-hand with number 3, but I would like to invent some of my own recipes and just be a bit creative with my baking this year.
9. Attempt bread.
This may sound ridiculously simple for you bread-lovers out there, and it probably is, but I’ve not made bread since Food Tech in High School, and I’d love to try it again!
10. Bake and Take round a small treat for someone who’s ill/sad/stressed.
This may sound a bit cheesy, but I just think it’d be a really nice thing to do!

I hope you feel a bit inspired by these, and maybe you might want to give one ago, but it’s just some challenges for me that I’d like to try and keep, so shared with you all!