Easter Nest Cups with Mini Egg Cheesecake Dip

Easter is nearly here! The run up to Easter always means several things to me: it means that summer isn’t too far away, that the sun might start to appear and it brings the anticipation of being able to complete whatever challenge I’ve set myself in Lent. Easter is also a very child-like holiday, we are encouraged to eat sweets and chocolate, celebrate new life (spiritually or otherwise) and there is the expectation that comes from the fact that if we have ‘behaved ourselves’ over lent, we can splurge at Easter! This recipe takes a classic kids Easter recipe (Easter Nests) and puts a little twist on it for kids or grown ups.

Easter Nests With A Twist
Prep Time: 15 mins
Cooling time: 1 hour plus

Ingredients
150g Shredded Wheat/ Plain cereal of your choice
300g Milk or Dark chocolate (I prefer dark)
50g Butter
225g Cream Cheese
170g Butter
2 tbsp Light brown sugar
250g Icing sugar
1 tsp Vanilla Extract
170g Mini Eggs
Mini Eggs to decorate

Method

1. Crush the shredded wheat/ cereal into small bits, using a spoon or just crushing between your fingers. Melt the chocolate and butter together, make sure the mixture is fully melted and combined, then add to the shredded wheat. Stir until all the cereal is coated in chocolate.
17916240_10154301982796143_126011896_o

2. Place 12 cupcake cases into a cupcake tray and divide the chocolate/ cereal mixture evenly between the 12 cupcake cases. Shape each nest into a cup by pressing down with a teaspoon into the middle of each case. Push the mixture up the sides of the cases with the back of the teaspoon.
17916461_10154301983926143_1232242685_o

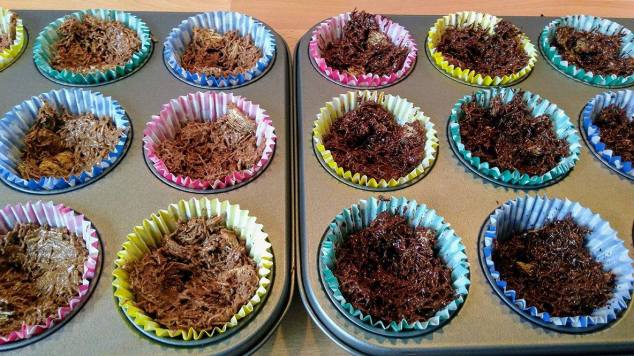
3. Place in the fridge to set.

4. Whilst the nests are cooling, make the cheesecake dip. First, beat the cream cheese and butter until fully combined. Then, add the sugars and essence and mix until combined. Finally, crush the bag of mini eggs and stir the crushed pieces into the mix.
17887451_10154301982801143_1225856911_o

5. Put in a bowl to set up a little in the fridge (preferably an hour or so)

6. Take the prepared chocolate nests out of the fridge and spoon a dollop of cheesecake mix into the centre of each one. Place a mini egg on top of each one and serve.
17916480_10154301983866143_202263623_o

Handy Hints

Cereal- Make sure that this is fully coated with the chocolate mix, and isn’t in too large chunks.
Mini Eggs- In order to crush these, I’ve found the best method is to double bag them and beat with a rolling pin. They are quite tricky to break, so make sure you’ve got them all!

Really Great Rolo Brownies

Before I start this recipe, apologies for those of you that follow this blog- I realise I haven’t posted in a while! I’ve been trying to eat healthier because, you know, new year, new you etc etc. Hence me trying not to bake so much because when you bake stuff you kind of have to eat it afterwards… shame I know! However, I’ve realised that cutting out sweets and puddings isn’t all that realistic, so I’m trying to aim more towards everything in moderation (plus more exercise!) Although this has meant cutting smaller slices of everything than seems reasonable to a sweet-tooth, it seems to be working so far! I’m under no illusion that this recipe is in the slightest bit healthy, so enjoy, but cut small pieces everyone…

Rolo Brownies

Ingredients

  • 200 g Dark Chocolate
  • 100 g Butter
  • 250 g Caster Sugar
  • 4 medium Eggs
  • 1 tsp Vanilla Essence
  • 60 g Plain Flour
  • 60 g Cocoa Powder
  • 150 g Dark Brown Soft Sugar
  • 150 g Butter
  • 397 g Condensed Milk
  • 200 g Milk Chocolate
  • 2 tubes Rolos

Method

  1. Preheat the oven to 180C. To make the brownie base, first break up the dark chocolate and melt, then put to the side to cool.
  2. Mix together the butter and caster sugar until fluffy, then add the eggs and vanilla essence, beating well after each addition. Take the melted dark chocolate from before (make sure that it’s not too hot) and add to the mixture. Mix in thoroughly then add the flour and cocoa powder and gently stir in.
  3. Spoon the mixture into a 20 x 25cm brownie tray then spread evenly. Bake in the oven for 20 mins, then place to one side to cool.16667875_10154139957481143_1010361292_o
  4. To make the caramel, heat the dark brown sugar and butter into a non-stick pan, stirring until melted. Then, add the condensed milk and bring to the boil, stirring continuously. Cook for a minute or so until you feel the mixture thicken. Take off the heat and allow to cool a little. The consistency should be as in the picture below- it should hold on the back of a spoon without running off.16651528_10154139957456143_1981830470_o
  5. Once the brownie base has had time to cool, pour the caramel over the brownie, spreading out until you have an even layer of caramel covering all the brownie. Leave to one side until the caramel has cooled completely.
  6. To decorate, melt the milk chocolate and pour over the caramel, spreading evenly and making sure you’re not pressing down too hard when spreading it (I’d use a palate knife or a spatula). Before the chocolate has set, sprinkle on the Rolos and any other decorations you like! I used chocolate chips and garnished with a chocolate pudding sauce (I would have preferred a thinner caramel sauce but I didn’t have any!)16710576_10154139957426143_1883307032_o
  7. Allow the top layer to set, then cut into slices and serve!

Handy Hints

Making the caramel- make sure that you use a non-stick pan for this. If you don’t because, like me, you’re thinking ‘meh, it doesn’t really matter’ then you’ll end up with black little dots in your caramel, which are little burnt bits of sugar. Tastes ok, but not ideal!

Setting time- It is important with the caramel and the chocolate, to let each layer cool before you add the next one. I realise this means patiently waiting, but if the layer you’re tying to add to is still hot then the two layers will just mash together.

16709634_10154139874911143_1164085339_o

Loaded Hot Chocolate

Now loaded hot chocolates are a trend that I have no trouble getting on board with! In case you aren’t on instagram, and so haven’t seen these, they’re basically a jenga game of unhealthy foods, balanced on top of a mug (or, if you’re indie, a Kilner jar) of hot chocolate. Although you could well do the same thing with milkshake (summer alternative?), this time of year definitely calls for a hot chocolate! We all know that there’s something particularly cozy about sitting in when it’s cold outside with a mug of hot chocolate and a book/ film. So, why not pile pudding onto that too?

The loaded hot chocolates I’ve made are incredibly easy- there’s no baking involved, just piling on ingredients! I’ve made a Christmas- themed mint one, and plan to make a cherry one too to mix it up a little, but you can vary the ingredients here to suit you. The only essentials are the hot chocolate and the whipped cream! So, stack to your heart’s content! Just remember to take a picture before it all sinks/ falls over…

Loaded Hot Chocolate

Prep time: 5- 10 mins
Cost: Low

Ingredients

Hot chocolate (flavour and brand entirely up to you!)
Whipped cream
Brownie chunks (I can recommend this recipe)
Small festive decorations (I bought some Maltesers Mini Reindeer)
A candy cane
Some sprinkles
Festive straws

Method

1. Make your hot chocolate, either with hot water or milk. For the festive recipe, I would recommend mint hot chocolate.
2. Top the hot chocolate with squirty cream, making sure that you pile it up high!
3. Cut a slice in the bottom of the brownie chunks and slot onto the rim of the glass/ mug. Alternatively, balance them on the cream.
4. Slide in the candy cane, leaving some showing.
5. Balance on your festive decoration (the reindeer in my case), preferably in the middle.
6. Add sprinkles, and a straw if you have one.
7. Serve on a small plate and enjoy!

Handy Hints

Cherry theme- To make a cherry alternative, why not add glace cherries instead of the festive decoration and candy cane?
Boozy hot chocolate- Add a shot of Bailey’s for a more adult hot chocolate!

imgp4063

imgp4065

Hidden Batman Cake

So last week I was asked to bake for a board games day in our village (yes, that’s as wonderfully nerdy as it sounds!), so I decided to make something that might appeal to those bakers/ lovers of cake that are a little more on the nerdy side. This being said, if nerdy isn’t quite your style, Batman can be replaced with another shape and you’re away! Surprise (or ‘hidden’) cakes are an amazing concept to me- I love the fact that, from the outside, the bake looks just like a normal loaf cake, but then you cut into it and BAM- there’s a cool design! The downfall with this of course is that this can render the baker a nervous wreck, as you don’t know whether it’s worked until you cut into it. Despite having made this recipe beforehand at uni, not knowing whether the pattern had worked until 5 minutes before the cafe at the games day opened was a little nerve-wracking to say the least! Having seen other hidden pattern cakes online, I’ve found that many of them use the same sponge mix in the middle (for their shape) as they do for the surrounding sponge. I found this a little dry, so my recipe uses a chocolate sponge in the centre to give it that little bit of variance and richness which is needed when you’re lacking a jam or buttercream layer in the middle of your slice.

Hidden Batman Cake

Prep Time: 40 minutes
Cooking Time: 30-40 minutes

Ingredients

2lb Loaf Tin (23 x 13cm/ 9″ x 5″)
Brownie Tin (35 x 25cm)

For the Batman centre:

1 Batman cutter (such as this one)
6oz Butter
6oz Caster Sugar
3 Eggs
4.5 oz Self-Raising Flour
1.5oz Cocoa Powder

For the sponge:

8oz Butter
8oz Caster Sugar
4 Eggs
1 tsp Vanilla Essence
8oz Self-Raising Flour

Method

1. Preheat the oven to 180C, grease the two trays and line them with greaseproof paper (this makes it SO much easier to remove from the tin!)
2. To make the Batman centre: soften the butter in the microwave and beat with the sugar until light and fluffy. Add the eggs, flour and cocoa powder and mix until fully incorporated.
3. Spoon the chocolate sponge mix into a brownie tin and spread evenly. Bake for 10-12 minutes, or until a skewer inserted into the middle of the cake comes out clean. Set aside, preferably on a wire cooling rack, to cool.
4. To make the sponge: soften the butter in the microwave and beat in the sugar until light and fluffy. Add the eggs, flour and vanilla essence and beat until all the ingredients are fully incorporated. Spoon a little under half of the mixture into the loaf tin, place in the oven and bake for around 10-15 minutes.
5. While the bottom half of the loaf cake is in the oven, take the cutter of your choice (in this case, Batman!) and press out 12 shapes from the chocolate mix. You want these shapes to be as accurate as possible to the cutter, so make sure to be careful when removing the sponge from the cutter!
6. Remove the bottom half of the sponge mix from the oven. The mixture should be spongy, but should not feel fully cooked (it will not yet be golden in colour).
7. In a line along the centre of the loaf tin (along the tin rather than across the tin, so that each slice will have a shape in it), place the shapes onto the partly-cooked sponge mix. Press the shapes tightly together and make sure that they are lined up as closely as possible.
8. Next, add the rest of the sponge mix around the sides and top of the shapes (making sure that the mix reaches the bottom half of the sponge at the sides and completely covers the shapes at the top.)
9. Place back in the oven and cook for 20-30 minutes until golden, and until a skewer inserted into the middle of the cake comes out clean.
10. Leave to cool, decorate with some buttercream (remove the mint from the buttercream in this recipe if you’re not sure how) and lift out of the tin onto a plate. When you’re ready to serve, cut the cake in half and pray that you lined your shapes up well enough/ that your oven cooks evenly enough for them to show through!

Handy Hints

Shapes– despite doing this myself, I would recommend that if you’re doing this for the first time and aren’t a particularly confident baker, you use a more simple shape than a batman cutter! The best thing is something with not too many edges. Make sure to line up the shapes as best you can!
Cooking the sponge– Don’t do what I did the second time I made this and leave the bottom half in for too long! It still turned out fine, but the bottom half of my mix was a little overcooked, and you could see a line where this happened!
Ovens– If you know that your oven doesn’t quite cook evenly, make sure that you turn your cake around half way through cooking, otherwise you’ll have wonky shapes through the middle.
Buttercream– This can be bought already made, or made very easily yourself, but it really does need to be added, as it brings a little moisture to the mix. Maybe decorate it with a clue to what’s inside?! I piped my first one with the words “Na Na Na Na, Na Na Na Na…”
Sponge mix– Don’t worry if the sponge mix takes longer for the top half to cook than the bottom half, it does take longer in a loaf tin for the top to cook.

batman-cake

Peppermint Squares

This post goes out to my brother, not only because this is one of his all-time favourite things to get from Cheshire Gap bakery, but also because he has a broken leg at the moment, so obviously deserves lots of cakes and chocolate!

These peppermint squares have a chocolate shortbread base, a fondant- type peppermint layer and a dark chocolate topping. They’re the perfect bake, partly because they only contain 7 ingredients and partly because they’re very simple, but very tasty! If you’re not so much of a mint fan, then this recipe can be easily adjusted to make chocolate orange squares, or maybe even cherry squares (because cherry and dark chocolate is amazing!), a bit like the Quality Street combinations. If you’re making these for a party, why not make some of each, with the addition of different food colouring so guests can tell them apart? Or maybe even without, making a chocolate squares roulette?!

This recipe was adjusted from a Waitrose recipe card (how middle class of me!), but I found that their recipe made the layers too thin, and that I needed to adjust the quantities of some of the ingredients. This recipe does include a lot of chilling time, so make sure you have plenty of time, or do something in the middle (some suggestions: wash up, dance around the kitchen, make tea, pretend to be Adele while singing, watch 2 episodes of Friends…)

Peppermint Squares

Cooking Time: 15-20 mins
Preparation Time: 15 mins
Cooling/ Chilling Time: 1 hour and a half or so (between stages)

Makes approx. 28 pieces

Ingredients

350g Butter
170g Light Brown Sugar
400g Plain Flour
4 tbsp Cocoa Powder
600g Icing Sugar
5-6 tbsp Water
1/2 tsp Peppermint Extract
400g Dark Chocolate
A small amount of butter (roughly 20g)

Baked in a 25 x 38cm brownie tin.

Method

1. Preheat the oven to 180C and grease and line the tin with greaseproof paper.
2. Mix together the butter and sugar until light and fluffy. Stir in the flour and cocoa powder until all the ingredients are fully combined.
3. Spread out in the tin, pressing down with the back of a spoon until the base is level and covers the whole tray. Bake in the oven for 15-20 mins until spongy, but only just set, then place to one side to cool.
4. To make the peppermint layer, beat together the icing sugar, 5-6 tbsp of water and peppermint extract until you have a mixture which is smooth and quite firm. It should resist when your stir it, and not be of easily pour-able consistency.
5. Spread the peppermint mixture over the shortbread base, spreading right to the edges of the tin and until level. Chill to firm (about an hour is ideal, but probably could be done in half an hour if needs be).
6. Break up the chocolate and heat in the microwave until melted. Melt the butter in a separate bowl in the microwave, then add to the chocolate and mix until fully combined. Once the peppermint layer has firmed, pour the chocolate over the filling, and spread until the chocolate covers all of the base layers. Chill for 30 mins or so before serving.

Handy Hints

Light Brown Sugar– Alternatively, use Caster Sugar and 1 tsp of Vanilla Essence.
Peppermint layer– You may need to adjust the amount of icing sugar in order to create the right consistency for this layer. If it’s too runny, add more icing sugar. If it’s too stiff, add a tiny bit more water. The balance will change more depending on the extract used, and if you use any colouring or not.
Base layer– When transferring this into the tin, it can be a bit of a pain to spread out to make it cover the whole tin. Use your (washed I hope!) hands to press down sections of the base, and grease the back of a metal spoon if using this to press the mix down.
Cooling time– Make sure you take the time to let things cool properly- if you add the middle layer while the base is too hot, it will make the icing runny, if you add the chocolate when the icing isn’t set, it will mix with the peppermint when you try to spread it.
Chocolate layer– Let this cool a little bit before pouring over the rest of the bake- if it’s too hot it will melt the middle layer!
peppermint-squares1

Peppermint Square (top), Orange Square (middle), Cherry Square (bottom). As you can see, my squares are not particularly even (Mary and Paul would be disappointed) and my icing is running out on the bottom layer, hence the comments about being patient with the cooling process!

Cheese scones

So lately, I’ve began my adventures into savoury baking and I’m actually really fond of it now! I’ve never been the kind of person who was very enthused about baking savoury things. To quote Miranda: “a savoury muffin?? Life is full of disappointments…” However, I’ve actually discovered that by baking things like these super-simple cheese scones I can actually save money and have some freshly- baked lunch. And we all know that shop-bought stuff never tastes quite as good as fresh baking!

These cheese scones are really easy and cheap to make, and only take half an hour (including baking time!) to make, so are perfect for those of you with not too much time or who are looking for something easy to bake. I find that they’re best enjoyed cut in half and spread with margarine, but they’d work well with ham or salad too. A perfect first-time bake for all you bakers out there who, like me, haven’t baked a whole lot of savoury stuff!

Cheese Scones

Preparation time: 15 minutes
Cooking time: 10-15 minutes

Ingredients
(makes 8)

1oz/ 28g Butter
6oz/ 170g Self-raising flour
3oz/ 85g Grated Cheese
1 Egg
2 tbsp Milk
1 egg or 1 tbsp milk (optional)

Method

1. Preheat the oven to 220C. Cut the butter into small cubes, then add the flour in a bowl with the butter.
2. Using your fingertips, rub the butter and flour together to make breadcrumbs.
3. Stir in the grated cheese.
4. Add the egg and the milk, and stir/ knead the dough until all the ingredients are combined and the mixture forms a coherent ball of dough.
5. Divide the mixture into 8 segments.
6. Place each segment onto a greased baking tray and squash/ roll flat (to about 1cm thick)
7. Coat the scones with either the extra egg (mixed up before hand) or the extra milk. This doesn’t need to be a thick coat and don’t worry if some runs off onto the tray, it just gives the scones more of a shine.
8. Bake in a pre-heated oven for 10-15 minutes, until golden and well risen.

Handy Hints

Breadcrumbs- When combined, these should just look like slightly darker flour i.e. there should be no lumps of butter left in the mixture.
Cheese- You can use any cheese you like for this, though I wouldn’t recommend using one that’s too creamy and not ‘solid’ enough (like Brie). I find that simple cheddar works best, or maybe red leicester but don’t be afraid to experiment!

IMG_2662


Back to basics: Tiffin

This week has been a good week to continue the (rough) theme on my blog recently of baking simple, but classic and enjoyable bakes. When I’m stressed out with work, or am baking things for an event but don’t have much time, I often find that it’s best to go back to basics a bit. It means the recipes are easier, quicker to make and, in this case, don’t even need cooking! Tiffin is the perfect recipe for all these things- it’s the perfect tray bake! Not only does tiffin not need oven time, meaning that you can throw it together in about 10-15 minutes, but it’s also a very adjustable! This is great trait in a recipe for students, the masters of the improvised what’s-in-my-cupboard meal. Not that I’d admit it to everyone (yes Mum, of course I eat properly when I’m at uni…), I’ve made my fair share of throw-together meals in my time! Bacon strips and pot noodle? Sure! Plain pasta and plain chicken? Of course! You get the idea… and tiffin is the throw-together meal of deserts!

All the ingredients below can be swapped out for pretty much anything else, with the exception of the chocolate, butter and golden syrup (but that stuff lasts ages!). All that you need to maintain is the balance of dry ingredients, and you’re good to go. I like tiffin to be chocolatey and fudgy rather than a dryer, bisuity mix, but if you prefer it more biscuit-like, simply reduce the amount of golden syrup and butter by about 25g.

Tiffin

Preparation Time: 10-15 minutes

Ingredients

250g Digestive biscuits
200g Dark Chocolate
125g Butter
175g Golden Syrup
100g Raisins
75g Glace Cherries
75g Maltesers

A 20cm (8oz) square tin lined with greaseproof paper or cling film.

Method

1. Crush the biscuits to fine crumbs, either by putting them in a zip-lock bag and bashing them with a rolling pin, or by hand. Leave some slightly larger chunks if you like biscuit pieces in your tiffin.
2. Put the chocolate, butter and golden syrup into a pan and melt gently until fully liquid and combined.
3. Take off the heat and add the chocolate mix to the biscuit crumbs and stir in, making sure that there’s no biscuit crumbs uncovered.
4. Add the other dry ingredients and stir until combined.
5. Tip mixture into the brownie tin, flatten out and place in the fridge.
6. Allow mixture to set in the fridge, then cut up and enjoy! Store in the fridge.

Handy Hints
Crushing biscuits- Having had a fair few disasters with the zip-lock bag technique, I tend to just crush the biscuits between my fingertips to get the consistency I want.
Melting the chocolate mixture- Don’t let the mixture boil or you run the risk of ruining it. Melt on a low heat- it shouldn’t take long!
Dry ingredients- you can pretty much substitute these for anything- I like to play with a mix of textures, so I go for raisins and cherries, but also something with a crunch like maltesers or, stay with me here, meringue pieces last time (I had some left, but it actually worked really well!)
Chocolate- I use dark chocolate because it’s my favourite, but you can use a mix of dark/ milk, all milk or all white if you wanted! (White chocolate and cranberries/ raspberries would be nice?!)


The sun is here! Quick, make some ice lollies…

Over the past two days in England it’s been BOILING. I know that compared to a lot of other countries, 30C is a laughably low temperature to be claiming that it’s too hot to function but, trust me, us Brits go to pieces when it’s this sunny. We’re just not used to it. All this sun makes working in the library nearly unbearable (it’s a million degrees in there and all I want to do is take a nap!), which means that I’ve been really fancying something cool and refreshing. Luckily, last week I took a trip to Ikea with my mum and sister and happened upon some ice lolly containers, which, because it was Ikea, I bought. I’d love to claim that it was through some amazing foresight and that I sensed hot weather coming but, realistically, I was in Manchester and it rained all day.

The idea for these ‘recipes’ is simple- there couldn’t be anything easier! You simply make a drink, then pour it into a container and stick it in the freezer! Below are two recipes: one which is more of a party/ adult lolly (as it contains alcohol) and one for you more relaxed and sophisticated people, which is an iced-tea ice lolly. Either would be great to sit outside with, whether you’re in the garden sunbathing, walking about in search of Pokemon, or having a garden party or barbecue with friends. So, make some room in your freezer and enjoy the good weather while you can!

Party Pops

(please excuse the cringe-worthy name)

Ingredients
(for one ice pop)
1 shot Peach Schnapps
1 shot Vodka (optional)
Cranberry Juice

Ice lolly moulds, such as these or these.

Method
1. Add one shot of peach schnapps and (optionally) one shot of vodka into a measuring jug/ mug per ice pop.
2. Add cranberry juice to taste.
3. Give the mixture a stir to distribute the alcohol a bit.
4. Pour into the lolly moulds and freeze.

Tea Pops
(makes 3 ice pops)

Ingredients
4 tea bags (I chose Blackcurrant and Elderflower)
Cold Water
Berries (optional)

Method

1. Boil 100ml of water and add all the teabags to it. Let them stew for at least 5 minutes.
2. Let the tea-infused water cool.
3. Add some cold water to top up the amount of liquid needed to fill the moulds.
4. (optional) add some berries into the mix (mushed up)
5. Pour mixture into the moulds and freeze.

Handy Hints- Party Pops
Cocktails- this recipe is modelled on a Woo Woo cocktail, but you can pretty much make any cocktail you like this way. Add orange juice to make Sex On The Beach.
Alcohol- The alcohol concentration can’t be too high, as the alcoholic ice pops won’t melt as well as non-alcoholic ones.

Handy Hints- Tea Pops
Tea blends- You can try this with any tea bags you have: experiment with different flavours! Add a little squeezy/ runny honey for a bit sweeter ice lolly.
Creamy ice pops- Try adding milk instead of the cold water for a creamy ice lolly rather than a more fruity one.

Ice Cream Cake

Summer is here!! For all you students and year 13s out there, that means you’re finished with exams- congrats! Take advantage of your time off to go and do fun stuff (maybe even bake something new…) I feel like I actually have a right to say that now that I’m working on my dissertation through summer. And yes I know, I brought that upon myself by doing a Masters degree, but that doesn’t mean I can’t sit here and feel sorry for myself, ok? But anyway,from the midst of my pity-party came a great idea- a combination of my favourite thing (cake) and summer (represented here by ice cream).

Although summer seems to be manifesting itself largely in the liquid sunshine form here in the UK so far, I feel that it’s summer-y enough to start consuming large quantities of ice cream.  I briefly toyed with the idea of making a baked alaska for my first summer post, but quickly realised that a) although it’s impressive, it seems like far too much effort and b) I don’t have the freezer space for a cake like that. Also, we all know how making baked alaska in the summer goes- especially if you’re in a very warm tent with other bakers… (too soon?!) The idea behind my ice cream cake seems to me to be much simpler, and also fit better in my shared freezer shelf! It has a brownie base, ice cream middle and chocolate ganache topping, which makes for a nice combination and isn’t too rich.

Ice Cream Cake

Baking time: 20 mins

Preparation time: 30 mins (not including cooking time)

Ingredients

200g Dark Chocolate
100g Butter
250g Caster Sugar
4 Eggs
1 tsp Vanilla Essence
60g Plain Flour
60g Cocoa Powder
900ml tub of Vanilla Ice Cream
100g Milk Chocolate
200ml Double Cream

I baked this in my 23cm diameter springform tin.

Method
1. Preheat the oven to 180C. Break up the dark chocolate and melt in the microwave until smooth. Set to one side.
2. Beat the butter and sugar until fluffy. Add the eggs, mixing a little after each one, then add the vanilla essence and mix until the eggs are fully combined.
3. Add the melted dark chocolate to the mixture and stir until combined. Next, add the flour and cocoa powder and mix until all the ingredients are well combined.
4. Spoon the mixture into a greaseproof paper-lined cake tin and spread evenly. Cook in the preheated oven for 20 minutes.
5. Remove the brownie base from the oven and set aside to cool. Once it is cool, take the ice cream out of the freezer to melt slightly.
6. Once the brownie base has cooled completely, spread the slightly melted ice cream onto the brownie base, spreading as evenly as possible and making sure to cover the brownie base. Once the ice cream has spread, place the cake tin in the freezer.
7. Whilst the ice cream re-sets in the freezer, make the chocolate ganache. To do this, first break the milk chocolate into pieces, then heat up the cream in a saucepan until boiling.
8. As soon as the cream reaches boiling point, add the cream to the broken up milk chocolate and stir until the chocolate melts and combines with the cream.
9. Once the cream and chocolate are combined, take the cake from the freezer and pour on the ganache. Spread the ganache evenly over the ice cream layer. It is important to do this quickly as the ice cream will start to melt due to the heat of the ganache, so as soon as it is spread, place the cake back in the freezer.
10. Store in the freezer until you’re ready to enjoy it!

Handy Hints
Ice Cream- Although I made this with vanilla ice cream, I think it would also be great with other flavours, such as mint or cherry (two of my favourites!) I would avoid anything too sweet though as it may make it too rich overall!
Cooking- These brownies are quite fudgy, but should still pass the knife/ cake tester test (i.e. the knife should come out clean after sticking it in the brownie)
Spreading Ice Cream- This process can be a little tricky. You want the ice cream to have melted enough so that you can (roughly) spread it, but not so much that it becomes soup! If it’s easier, cut chunks of ice cream and fit them together like a jigsaw on the brownie base!
Ganache- When making the ganache, keep stirring the cream and chocolate at all time until they’re combined. If you let it cool too much, it’s still fine but it will have a thicker consistency, if you want a smooth, glossy finish then you’ll have to add the ganache whilst it’s still quite warm.
Serving- If you are serving the whole thing at once, then defrost for 5-10 minutes before serving. If you want to cut a slice or two, this is more difficult but I found that for the most part it cut ok, even when I’d just taken it out of the freezer. Don’t leave it too long or the ice cream will melt everywhere!


13621008_10153582408586143_5882386355269474609_n

P.S. The apples totally offset the huge slice of cake, right?!

Jaffa Cake Cupcakes

The other week, I introduced my international friend to the concept of Jaffa Cakes. Ironically, they asked the age old question: is a Jaffa Cake a biscuit or a cake? People have debated this a lot and I’m sure that there’s food-y people out there who can tell me, but I can tell you now the true answer: Who cares?! The more you debate about it, the more other people can eat while you talk about it!

Not to sound too British, but I do love a good biscuit (/cake), especially with a cup of tea! However, I have felt for a while that some snacks of this description should be incorporated into a pudding of some sort. This is the thought that created the idea, whilst food shopping, of Jaffa Cake cupcakes. They’re easy to make into cupcakes, because they’re essentially three elements: chocolate, orange curd and sponge. Even if you’re a beginner to baking, you’ll see that this isn’t a conversion that’s hard to create! And what better than a cake and a Jaffa Cake on top (that’s two puddings in one!!)

Jaffa Cake Cupcakes

Preparation time: 30-40 minutes
Baking time: 10-15 minutes
Makes 12 cupcakes

Ingredients
For the sponge:
110g (4oz) Butter
110g (4oz) Caster Sugar
2 eggs
110g (4oz) Self-raising Flour
1 tsp Vanilla Essence

Orange Marmalade (or see this recipe for 10-minute orange curd)

For the Icing:
130g Butter
500g Icing Sugar
170g Cocoa Powder
3-4 tbsp Milk
1/2 tsp Vanilla Essence

12 Jaffa Cakes for decoration

Method
1. Preheat the oven to 180C. Beat the butter and sugar together in a mixing bowl until the mixture is fluffy.
2. Add the eggs one at a time and beat into the mixture until combined.
3. Add the flour and vanilla essence and mix until all the ingredients are thoroughly combined.
4. Spoon the mixture and divide evenly into the cupcake cases. Bake for 10-15 minutes until the sponge is golden and springs back when pressure is applied to it.
5. When the cupcakes have baked, set them aside to cool.
6. To make the icing, soften the butter in the microwave, then beat together the icing sugar, cocoa powder and butter until combined. Add the vanilla essence. Add the milk a little at a time until the icing is a good texture.
7. Once the cupcakes have cooled, using a teaspoon, hollow out a small section from the top of the cupcake and fill with orange curd/ marmalade. Replace most of the sponge back on the top of the curd/ marmalade (as if you’re putting a lid over the orange). Repeat for all the cupcakes.
8. Cover the cupcakes with the chocolate icing.
9. Cut 12 Jaffa Cakes in half, and using two halves, create a butterfly effect by placing one half on each side of the cupcake.

Handy Hints
Icing texture– this matters more if you choose to pipe your icing onto the cakes. If you do, it needs to be firm enough that the mixture holds on a spoon (i.e. it doesn’t drip off the spoon), but not too stiff that it doesn’t mix easily.
Adding the orange– for more tips on this, see this recipe.
Adding the icing– Piping the icing gives a more neat effect (and possibly adds more icing), but this works just as well with a knife and using the back of a spoon to shape.

Jaffa cake cupcakes

Jaffa cake cupcakes3