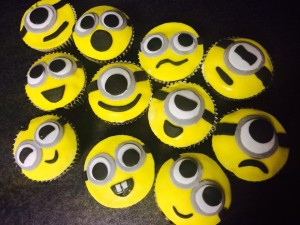
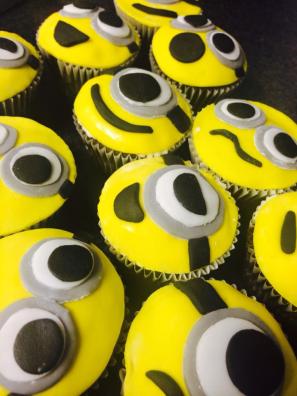
Hi everyone! This week I’m attempting to actually write this post earlier on in the week for a change, and be organised in my writing. I say this but in actual fact I’m just writing this as a way of procrastinating from writing my essay! So, Christmas is coming, which for students means only one thing… deadline madness! Because, obviously, as a student you’re not allowed to enjoy work-free holidays in order to account for the mega-long summer we get, you know kind of like karma. I’ve been set a fair bit of work over the past few weeks, which means that, naturally, I’ve been begging for any excuse to procrastinate. And what better way to procrastinate then by baking 24 minion-themed cupcakes and a 3D minion cake! I mean that’s pretty standard right? No? Must be just me then.
Really though there was a reason behind this, as it came in the form of another baking request for a birthday, this time for a flatmates’ girlfriends’ 21st. So, procrastination with a great cause- how could I resist? I took a day out of working and actually spent from 3-11pm baking like a crazed person with stuff all over the kitchen (sorry flatmates!). It was great fun though and I enjoyed the challenge of baking it all with limited resources in a uni kitchen, and with the others giving me a hand too (thank you flatmates!). I wanted to share the instructions here for how I made the cupcakes as they were actually really simple, but looked so cute!! If any of you would be interested in me posting a tutorial on how to decorate the cake, then comment and let me know and I’ll see if I can describe how I improvised it.
Minion Cupcakes
Decorating Time: 30-40 minutes (but could probably be done much faster if you don’t faff)
Ingredients:
Yellow Sugarpaste
White Sugarpaste
Black Sugarpaste
Tap water
Buttercream
Tools:
Small paintbrush (/hands)
Circle cutters/ objects with circles bases you can draw around
A small but fairly sharp knife
Method:
1. Cut a circle for each cupcake out of the yellow sugarpaste. It should be just a little bigger then the surface of the cupcake, as the top is rounded so it will be a bit smaller then it looks.
2. Stick the circles to the cupcakes using buttercream. Spread a layer of buttercream on the cupcake, then gently press the circle onto the cake, smoothing as you go.
3. Using a pea-sized amount of black sugarpaste, mix a grey sugarpaste by folding the black sugarpaste into the white and kneading in until the colour is fully mixed and isn’t streaky. Don’t use all your white for this, as you’ll need white later.
4. Cut grey circles to form the goggle rims. These need to take up about 2/3 of the cupcake in height, making them possibly slightly bigger for the minions with one eye than the ones with two eyes. Cut out one or two for each cupcake.
5. Using a cutter that is one size down from the grey cutter, press out white circles to make the eyeballs of the minions. Stick these on top of the grey circles using a little bit of water. Water acts like glue with sugarpaste, so you only need a tiny bit, spread evenly across the back of the white circle, to make it stick.
6. Cut small black circles out to form the pupils of the eyes. These don’t want to be too small, ideally about 1/4 or 1/3 of the eye in height. Stick these onto the white circles using water.
7. Stick the completed eyes onto the yellow base of the cupcake using water. Place them about 2/3 up the cupcake, so there is room to place a small mouth later.
8. Using the black sugarpaste, cut out mouth shapes that you want your minions to have. Roll out the sugarpaste and cut these with a sharp, small knife. Some easy expressions are shocked (just a circle shape), really happy (a bit D shape, and you could stick little white squares in for teeth) and a smile (cut a semi-circle and then cut the outside curve into a thin strip). Let your imagination run wild!
9. Stick the mouths onto the yellow bases on the cupcakes using water.
10. Using any leftover black, cut thin strips to make the straps of the goggles. Use the knife for this, and hold up against the cupcakes to make sure you have the right length before cutting and sticking down onto the yellow base. You want to strip to stretch from the grey circle (the goggle) to the outside edge of the cupcake, all the way down to the edge of the yellow base circle.
Handy Hints:
Sugarpaste- When using sugarpaste, it’s really important that you leave any sugarpaste you’re not currently using in an airtight bag, fully covered. Sugarpaste becomes unusable incredibly quickly, so keep everything except already cut pieces and the sugarpaste you’re currently rolling out and cutting in an airtight bag.If you don’t think you’ll work quickly enough, stick the grey goggle circles onto the yellow as soon as they’re made, then add the white and black as you go, instead of assembling them off the cupcake, then sticking them on.
Cutters- Use cutter sets which have many different circle sizes in them, or simply use the base of a round object and cut around it. We used a bottle top, a shot glass and a cup base to get the sizes we didn’t have in the cutters!
Black colouring- Black sugarpaste is a nightmare!! Make sure that you use a separate part of the counter to roll out the black, because if you get any on the other colours, it runs really easily and is very noticable, trust me.
Sugarpaste colouring- To get your colours, you can either buy pre-mixed colours (Asda now does a really good range, which we bought and can be found here), or you can hand mix them by buying a pack of white sugarpaste, then adding paste colourings to them.
Sugarpaste- Sugarpaste is also called ‘Ready to roll icing’ in a lot of places, just to save confusion!
 Photography, as usual by Nitya Kanoria. Click here to check out her blog, which has more amazing photos and some great travel experiences.


